This is the fourth in a series of posts that will walk you through using the Openstack-based OVH public cloud. In this post you will get introduced to using Vagrant to create Openstack servers using the Openstack API. This post is assumes you have already signed up for an account with ovhcloud.com, added a payment method, created a cloud project, created an Openstack user, created a ssh keypair in the Horizon UI and downloaded the openrc.sh file for this user. If you have not done these steps you can follow the steps in the first and second blog post in this series that will walk you through completing those steps.
I will attempt in this post to present the options that are available to OVH public cloud customers along side the choices I made that were specific to my Openstack server. Let’s get started…
1. Install Vagrant
The first thing you will need to do before you can move forward with this post is install Vagrant. Go to https://www.vagrantup.com/downloads.html, download the installer for your specific operating system and install Vagrant.
2. Install the Vagrant Openstack provider
You will next need to install the Vagrant Openstack provider.
MacBook-Pro:~ standorsett$ vagrant plugin install vagrant-openstack-provider
Installing the 'vagrant-openstack-provider' plugin. This can take a few minutes...
Fetching: terminal-table-1.4.5.gem (100%)
Fetching: sshkey-1.6.1.gem (100%)
Fetching: colorize-0.7.3.gem (100%)
Fetching: public_suffix-2.0.5.gem (100%)
Fetching: vagrant-openstack-provider-0.13.0.gem (100%)
Installed the plugin 'vagrant-openstack-provider (0.13.0)'!
MacBook-Pro:~ standorsett$
3. Create a new directory and add your Vagrantfile
When using the vagrant command, it will look for a Vagrantfile in the current directory. As a result you should create a new directory for containing the Vagrantfile we will use for our Openstack server.
MacBook-Pro:~ standorsett$ mkdir -p ~/Documents/vagrant/ovh_public_cloud_centos_7
MacBook-Pro:~ standorsett$ cd ~/Documents/vagrant/ovh_public_cloud_centos_7
MacBook-Pro:ovh_public_cloud_centos_7 standorsett$
Next you will need to create a Vagrantfile in our new directory that will describe the server you are wanting to have created.
MacBook-Pro:ovh_public_cloud_centos_7 standorsett$ cat Vagrantfile
require 'vagrant-openstack-provider'

Vagrant.configure('2') do |config|

  config.vm.define :'vagrant-centos7' do |v|

    v.ssh.username = 'centos'
    v.ssh.private_key_path = '~/.ssh/id_rsa-ovhus_public_cloud'
    v.ssh.insert_key = 'false'
    v.vm.synced_folder '.', '/vagrant', type: 'rsync'
    v.vm.provider :openstack do |provider|
      provider.openstack_auth_url    = ENV['OS_AUTH_URL']
      provider.openstack_network_url = 'https://network.us-east-va-1.cloud.ovh.us/v2.0'
      provider.identity_api_version  = ENV['OS_IDENTITY_API_VERSION']
      provider.username              = ENV['OS_USERNAME']
      provider.password              = ENV['OS_PASSWORD']
      provider.domain_name           = ENV['OS_USER_DOMAIN_NAME']
      provider.project_name          = ENV['OS_TENANT_NAME']
      provider.flavor                = ''
      provider.image                 = ''
      provider.keypair_name          = 'vagrant-keypair'
      provider.region                = ENV['OS_REGION_NAME']
      provider.networks              = [ 'Ext-Net' ]
    end
  end
end
MacBook-Pro:ovh_public_cloud_centos_7 standorsett$
The v.ssh.private_key_path should reference the ssh private key file that was created in our second blog post. The provider.keypair_name should be set to match the name of the keypair you created in the Openstack Horizon UI in the second blog post. The provider.image and provider.flavor values are initially blank, but you will update those shortly.
You also might notice that most of the details in this Vagrantfile are referencing ENV which means they will be pulled from environment variables.
4. Source your openrc.sh file
Source the openrc.sh you previously downloaded for your Openstack user. Enter the password for your Openstack user when prompted. This step will export the environmental variables that the Vagrantfile needs in order to create the Openstack server.
MacBook-Pro:ovh_public_cloud_centos_7 standorsett$ source ~/Downloads/openrc.sh
Please enter your OpenStack Password:
MacBook-Pro:ovh_public_cloud_centos_7 standorsett$
5. Test connecting to the OVH public cloud.
You can now test connecting to the OVH public cloud API by running vagrant status
MacBook-Pro:ovh_public_cloud_centos_7 standorsett$ vagrant status
Current machine states:

vagrant-centos7           not created (openstack)

The server is not created. Run `vagrant up` to create it.
MacBook-Pro:ovh_public_cloud_centos_7 standorsett$
If you received a message that the server was not created, then your credentials and Openstack details are valid.
6. Using the Vagrant Openstack provider to query for available flavor and images.
The Vagrant Openstack provider can be used us query the Openstack API for available resources. I knew I wanted to use a Centos image so I ran vagrant openstack image-list | egrep '(--|Name|Centos)' to return images that contained the name Centos:

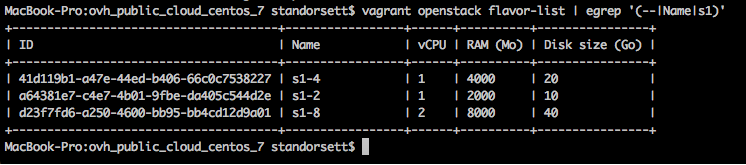
I also knew I wanted to use a sandbox image, which all start with s1 in the name, so I ran vagrant openstack flavor-list | egrep '(--|Name|s1)' to return all s1 images:
6. Update your Vagrantfile to reflect the image and flavor name that you want to use.
After using the Vagrant Openstack provider to return the available image and flavor names, update your Vagrantfile to reference the image and flavor you want to use. I chose “Centos 7” and “s1-2” for mine.
MacBook-Pro:ovh_public_cloud_centos_7 standorsett$ cat Vagrantfile
require 'vagrant-openstack-provider'

Vagrant.configure('2') do |config|

  config.vm.define :'vagrant-centos7' do |v|

    v.ssh.username = 'centos'
    v.ssh.private_key_path = '~/.ssh/id_rsa-ovhus_public_cloud'
    v.ssh.insert_key = 'false'
    v.vm.synced_folder '.', '/vagrant', type: 'rsync'
    v.vm.provider :openstack do |provider|
      provider.openstack_auth_url    = ENV['OS_AUTH_URL']
      provider.openstack_network_url = 'https://network.us-east-va-1.cloud.ovh.us/v2.0'
      provider.identity_api_version  = ENV['OS_IDENTITY_API_VERSION']
      provider.username              = ENV['OS_USERNAME']
      provider.password              = ENV['OS_PASSWORD']
      provider.domain_name           = ENV['OS_USER_DOMAIN_NAME']
      provider.project_name          = ENV['OS_TENANT_NAME']
      provider.flavor                = 's1-2'
      provider.image                 = 'Centos 7'
      provider.keypair_name          = 'vagrant-keypair'
      provider.region                = ENV['OS_REGION_NAME']
      provider.networks              = [ 'Ext-Net' ]
    end
  end
end
MacBook-Pro:ovh_public_cloud_centos_7 standorsett$
7. Run vagrant up to create the Openstack server
The next step is for you to run vagrant up to create the Openstack server as defined in your Vagrantfile.
I want to give one warning that this command will not succeed successfully with vagrant-openstack-provider version 0.13.0, but we will address these issues in a moment. I pressed control-c after receiving a few of the Host unreachable messages to break out of Vagrant.
MacBook-Pro:ovh_public_cloud_centos_7 standorsett$ vagrant up
Bringing machine 'vagrant-centos7' up with 'openstack' provider...
==> vagrant-centos7: Finding flavor for server...
==> vagrant-centos7: Finding image for server...
==> vagrant-centos7: Finding network(s) for server...
==> vagrant-centos7: Launching a server with the following settings...
==> vagrant-centos7:  -- Tenant          :
==> vagrant-centos7:  -- Name            : vagrant-centos7
==> vagrant-centos7:  -- Flavor          : s1-2
==> vagrant-centos7:  -- FlavorRef       : a64381e7-c4e7-4b01-9fbe-da405c544d2e
==> vagrant-centos7:  -- Image           : Centos 7
==> vagrant-centos7:  -- ImageRef        : e0a89ff2-e98f-4a34-afae-68f9f6c9b5ad
==> vagrant-centos7:  -- KeyPair         : vagrant-keypair
==> vagrant-centos7:  -- Network         : b347ed75-8603-4ce0-a40c-c6c98a8820fc
==> vagrant-centos7: Waiting for the server to be built...
==> vagrant-centos7: Waiting for machine to boot. This may take a few minutes...
    vagrant-centos7: SSH address: 2604:2dc0:101:100::1b:22
    vagrant-centos7: SSH username: centos
    vagrant-centos7: SSH auth method: private key
    vagrant-centos7: Warning: Host unreachable. Retrying...
    vagrant-centos7: Warning: Host unreachable. Retrying...
    vagrant-centos7: Warning: Host unreachable. Retrying...
^C
==> vagrant-centos7: Waiting for cleanup before exiting...
An unknown error happened in Vagrant OpenStack provider

To easily debug what happened, we recommend to set the environment
variable VAGRANT_OPENSTACK_LOG to debug

    $ export VAGRANT_OPENSTACK_LOG=debug

If doing this does not help fixing your issue, there may be a bug
in the provider. Please submit an issue on Github at
https://github.com/ggiamarchi/vagrant-openstack-provider
with the stracktrace and the logs.

We are looking for feedback, so feel free to ask questions or
describe features you would like to see in this provider.
Catched Error: Catched Error: Catched Error: Vagrant exited after cleanup due to external interrupt.
MacBook-Pro:ovh_public_cloud_centos_7 standorsett$
If you look back at the output of your command you will see a line displaying a message like SSH address: 2604:2dc0:101:100::1b:22
You will also see that the same IPV6 address is returned for the HostName when you run vagrant ssh-config
MacBook-Pro:ovh_public_cloud_centos_7 standorsett$ vagrant ssh-config
Host vagrant-centos7
  HostName 2604:2dc0:101:100::1b
  User centos
  Port 22
  UserKnownHostsFile /dev/null
  StrictHostKeyChecking no
  PasswordAuthentication no
  IdentityFile /Users/standorsett/.ssh/id_rsa-ovhus_public_cloud
  IdentitiesOnly yes
  LogLevel ERROR

MacBook-Pro:ovh_public_cloud_centos_7 standorsett$
8. Updating the Vagrant Openstack provider to return an IPV4 address
There is an open pull request for the Vagrant openstack provider to allow a user to specify if the provider should connect to an IPV4 or IPV6 address. Until that pull request is merge I would suggest making these suggested changes to ~/.vagrant.d/gems/2.4.4/gems/vagrant-openstack-provider-0.13.0/lib/vagrant-openstack-provider/utils.rb
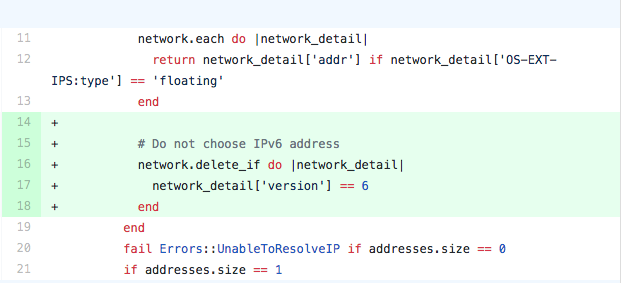
After modifying the utils.rb file try running vagrant ssh-config again to make sure the command is returning an IPV4 address.
MacBook-Pro:ovh_public_cloud_centos_7 standorsett$ vagrant ssh-config
Host vagrant-centos7
  HostName 147.135.76.34
  User centos
  Port 22
  UserKnownHostsFile /dev/null
  StrictHostKeyChecking no
  PasswordAuthentication no
  IdentityFile /Users/standorsett/.ssh/id_rsa-ovhus_public_cloud
  IdentitiesOnly yes
  LogLevel ERROR

MacBook-Pro:ovh_public_cloud_centos_7 standorsett$
8. Use Vagrant to destroy and re-deploy the Openstack server
Now that Vagrant is returning an IPV4 address it should deploy correctly. Destroy your Openstack server by running vagrant destroy -f
MacBook-Pro:ovh_public_cloud_centos_7 standorsett$ vagrant destroy
==> vagrant-centos7: Deleting server...
==> vagrant-centos7: Waiting for the server to be deleted...
MacBook-Pro:ovh_public_cloud_centos_7 standorsett$
…followed by vagrant up to deploy it again
MacBook-Pro:ovh_public_cloud_centos_7 standorsett$ vagrant up
Bringing machine 'vagrant-centos7' up with 'openstack' provider...
==> vagrant-centos7: Finding flavor for server...
==> vagrant-centos7: Finding image for server...
==> vagrant-centos7: Finding network(s) for server...
==> vagrant-centos7: Launching a server with the following settings...
==> vagrant-centos7:  -- Tenant          :
==> vagrant-centos7:  -- Name            : vagrant-centos7
==> vagrant-centos7:  -- Flavor          : s1-2
==> vagrant-centos7:  -- FlavorRef       : a64381e7-c4e7-4b01-9fbe-da405c544d2e
==> vagrant-centos7:  -- Image           : Centos 7
==> vagrant-centos7:  -- ImageRef        : e0a89ff2-e98f-4a34-afae-68f9f6c9b5ad
==> vagrant-centos7:  -- KeyPair         : vagrant-keypair
==> vagrant-centos7:  -- Network         : b347ed75-8603-4ce0-a40c-c6c98a8820fc
==> vagrant-centos7: Waiting for the server to be built...
==> vagrant-centos7: Waiting for machine to boot. This may take a few minutes...
    vagrant-centos7: SSH address: 147.135.76.17:22
    vagrant-centos7: SSH username: centos
    vagrant-centos7: SSH auth method: private key
    vagrant-centos7: Warning: Connection refused. Retrying...
    vagrant-centos7: Warning: Connection refused. Retrying...
==> vagrant-centos7: Machine booted and ready!
==> vagrant-centos7: Installing rsync to the VM...
==> vagrant-centos7: Rsyncing folder: /Users/standorsett/Documents/vagrant/ovh_public_cloud_centos_7/ => /vagrant
MacBook-Pro:ovh_public_cloud_centos_7 standorsett$
You can see in my output that Vagrant successfully connected to the assigned IPV4 address, installed rsync and used it to copy over the folder that contained the Vagrantfile to /vagrant.
9. Connect to your Openstack server
Connecting to your Openstack server created by Vagrant is as easy as running vagrant ssh
MacBook-Pro:ovh_public_cloud_centos_7 standorsett$ vagrant ssh
[centos@vagrant-centos7 ~]$ cd /vagrant/
[centos@vagrant-centos7 vagrant]$ ls -la
total 12
drwxr-xr-x   2 centos centos 4096 Aug 19 23:31 .
dr-xr-xr-x. 19 root   root   4096 Aug 19 23:59 ..
-rw-r--r--   1 centos centos 1063 Aug 19 23:31 Vagrantfile
[centos@vagrant-centos7 vagrant]$ cat Vagrantfile
require 'vagrant-openstack-provider'

Vagrant.configure('2') do |config|

  config.vm.define :'vagrant-centos7' do |v|

    v.ssh.username = 'centos'
    v.ssh.private_key_path = '~/.ssh/id_rsa-ovhus_public_cloud'
    v.ssh.insert_key = 'false'
    v.vm.synced_folder '.', '/vagrant', type: 'rsync'
    v.vm.provider :openstack do |provider|
      provider.openstack_auth_url    = ENV['OS_AUTH_URL']
      provider.openstack_network_url = 'https://network.us-east-va-1.cloud.ovh.us/v2.0'
      provider.identity_api_version  = ENV['OS_IDENTITY_API_VERSION']
      provider.username              = ENV['OS_USERNAME']
      provider.password              = ENV['OS_PASSWORD']
      provider.domain_name           = ENV['OS_USER_DOMAIN_NAME']
      provider.project_name          = ENV['OS_TENANT_NAME']
      provider.flavor                = 's1-2'
      provider.image                 = 'Centos 7'
      provider.keypair_name          = 'vagrant-keypair'
      provider.region                = ENV['OS_REGION_NAME']
      provider.networks              = [ 'Ext-Net' ]
    end
  end
end
[centos@vagrant-centos7 vagrant]$ ip a show dev eth0
2: eth0: <BROADCAST,MULTICAST,UP,LOWER_UP> mtu 1500 qdisc pfifo_fast state UP qlen 1000
    link/ether fa:16:3e:79:76:78 brd ff:ff:ff:ff:ff:ff
    inet 147.135.76.17/32 brd 147.135.76.17 scope global dynamic eth0
       valid_lft 85791sec preferred_lft 85791sec
    inet6 fe80::f816:3eff:fe79:7678/64 scope link
       valid_lft forever preferred_lft forever
[centos@vagrant-centos7 vagrant]$
10. Destroy your Vagrant Openstack server.
After you are finished testing your Openstack server, you should destroy it in order to prevent being charged for it’s usage. This can be done using the same vagrant destroy command we did earlier.
MacBook-Pro:ovh_public_cloud_centos_7 standorsett$ vagrant destroy
==> vagrant-centos7: Deleting server...
==> vagrant-centos7: Waiting for the server to be deleted...
MacBook-Pro:ovh_public_cloud_centos_7 standorsett$
That all for this post covering how to use Vagrant to quickly deploy a OVH public cloud server. In this post you have only scratched the surface of what you can do with Vagrant, but hopefully if showed how simple it is to get started. Please provide any feedback or suggestions to my twitter account located on the about page.