In this post I’m setting out to explain how to create a CentOS 6.4 vm, from template, in vCHS (or a vCloud Director instance) and then install vagrant-vcloud on that.
1. Create a CentOS 6.x minimal virtual machine from a template in a vCHS organization.
I will demonstrate creating a new CentOS vm in vCHS using a template, but you could just as easily create a new CentOS virtual machine from scratch in vCloud Director.
Log into vCHS using your credentials and click on your virtual datacenter.
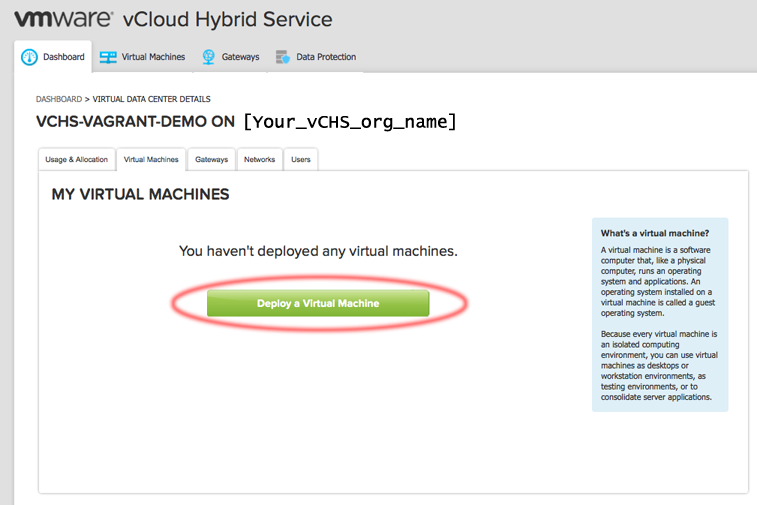
Next click on the “Virtual Machines” tab and then click the “Deploy a Virtual Machine” button:
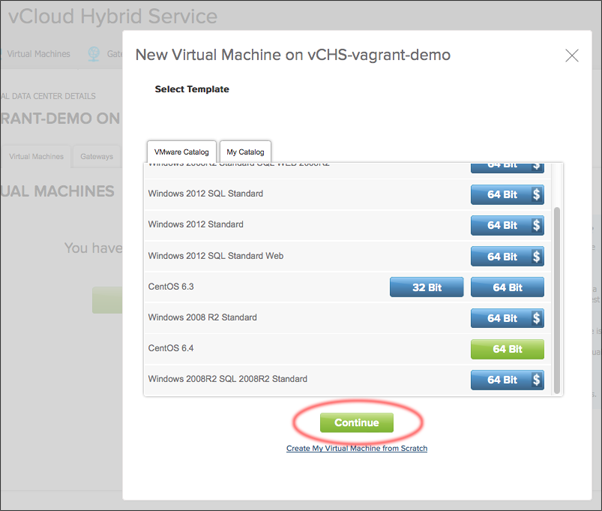
- Select the “CentOS 6.4 64 Bit” template and click “Continue”
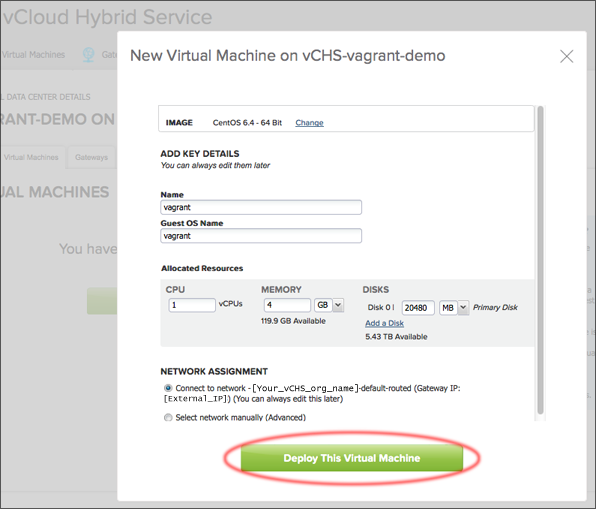
- Name the virtual machine and set the guest OS name of your new virtual machine. Click “Deploy This Virtual Machine”:
I named my virtual machine and set the guest OS name both to “vagrant”, but you can change these to what ever you prefer.
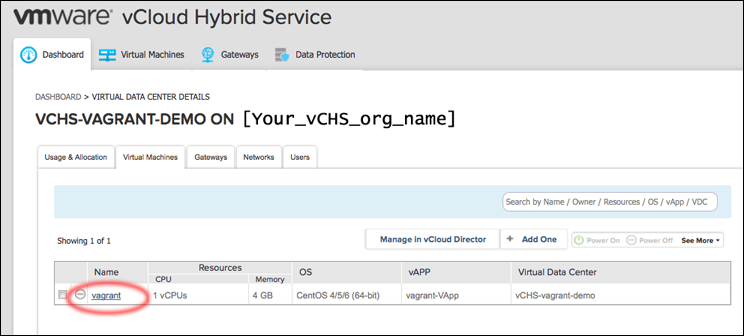
- Power on and then click the name of the virtual machine you just created:
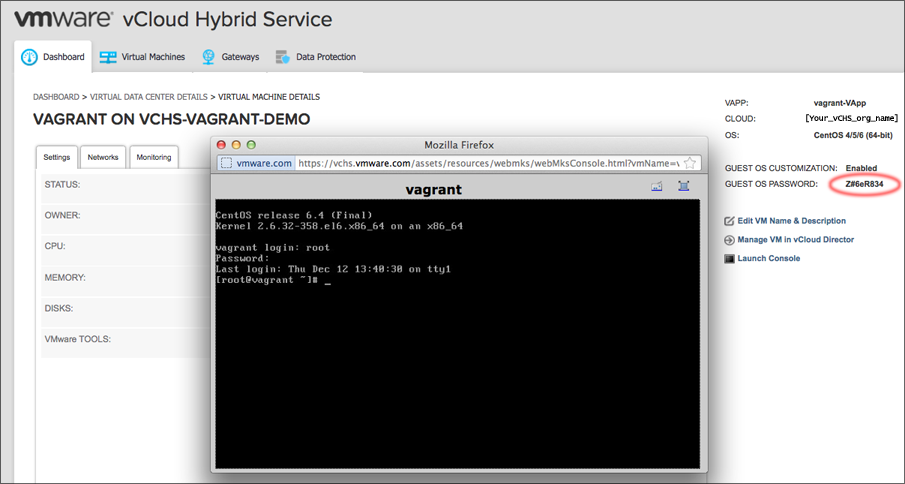
- Click the “Launch Console” link to open the console of the virtual machine you just created.
Notice that the guest OS password created by guest customization is displayed on the left. Log into the virtual machine, using “root” and the displayed password, then change this password immediately to something else:
2. Modify /etc/resolv.conf
[root@vagrant ~]# cat /etc/resolv.conf
nameserver 8.8.8.8
nameserver 8.8.4.4
At this point you should have network connectivity to your new vagrant vapp. While I won’t cover it in the post, you can now either setup a DNAT rule to forward SSH to the vagrant vapp or continue the configuration using the vapp console.
3. Install Ruby 1.9.3 using ruby-build:
- Use yum to install the packages we’ll need to get ruby, rubygems and vagrant installed:
[root@vagrant ~]# yum install -y gcc-c++ glibc-headers openssl-devel readline libyaml-devel readline-devel zlib zlib-devel iconv-devel libxml2 libxml2-devel libxslt libxslt-devel wget git- Pull down the latest version of ruby-build using git:
[root@vagrant ~]# git clone https://github.com/sstephenson/ruby-build.git- Change to the directory the previous command created:
[root@vagrant ~]# cd ruby-build/- Run the ‘install.sh’ script to install ruby-build:
[root@vagrant ruby-build]# ./install.sh- I would recommend installing Ruby version 1.9.3-p545 with the following command:
[root@vagrant ruby-build]# ruby-build --definitionsruby-build 1.9.3-p545 /usr/local/
Downloading yaml-0.1.6.tar.gz...
-> http://dqw8nmjcqpjn7.cloudfront.net/5fe00cda18ca5daeb43762b80c38e06e
Installing yaml-0.1.6...
Installed yaml-0.1.6 to /usr/local/

Downloading ruby-1.9.3-p545.tar.gz...
-> http://dqw8nmjcqpjn7.cloudfront.net/8e8f6e4d7d0bb54e0edf8d9c4120f40c
Installing ruby-1.9.3-p545...

Installed ruby-1.9.3-p545 to /usr/local/
4. Install rubygems by downloading the latest version from rubygems.org and install it:
- Use wget to download the latest version listed on the rubygems download page:
[root@vagrant ruby-build]# cd ~/
[root@vagrant ~]# wget http://production.cf.rubygems.org/rubygems/rubygems-2.2.2.tgz- Use tar to unzip the tar-gzipped file we downloaded:
[root@vagrant ~]# tar xvzf rubygems-2.2.2.tgz
[root@vagrant ~]# cd rubygems-2.2.2- Install rubygems by running the ‘setup.rb’ script:
[root@vagrant rubygems-2.2.2]# ruby setup.rb5. Install Vagrant
- Use wget to download the latest version listed on the Vagrant download page:
[root@vagrant rubygems-2.2.2]# cd ~/
[root@vagrant ~]# wget https://dl.bintray.com/mitchellh/vagrant/vagrant_1.6.2_x86_64.rpm- Use the ‘rpm’ command to install the RPM package we downloaded in the previous step:
[root@vagrant ~]# rpm -i vagrant_1.6.2_x86_64.rpm- Export the directory that the vagrant executable was install to, in order to make it easier to run:
[root@vagrant ~]# export PATH=$PATH:/opt/vagrant/bin/6. Installing the vagrant-vcloud plugin
[root@vagrant blog]# vagrant plugin install vagrant-vcloud
Installing the 'vagrant-vcloud' plugin. This can take a few minutes...
Installed the plugin 'vagrant-vcloud (0.3.3)'!
7. Creating a Vagrantfile for testing vagrant-vcloud install
- We need to create a directory structure and Vagrantfile to test that the vagrant-vcloud provider is properly working. For the .box file we will use a sample precise32 (Ubuntu 12.04 32bit) vagrant .box file created for the vcloud provider by Timo Sugliani:
[root@vagrant ~]# mkdir -p ~/vagrant-vms/precise32-test
[root@vagrant ~]# cat ~/vagrant-vms/precise32-test/Vagrantfile
precise32_vm_box_url = "http://vagrant.tsugliani.fr/precise32.box"

nodes = [
  { :hostname => "test-vm",
    :box => "precise32",
    :box_url => precise32_vm_box_url }
]

Vagrant.configure("2") do |config|

  # vCloud Director provider settings
  config.vm.provider :vcloud do |vcloud|

    vcloud.hostname = 'https://[Your_vCD_URL]:443'
    vcloud.username = '[Your_vCHS_username@somedomain.com]'
    vcloud.password = '[Your_vCHS_password]'

    vcloud.org_name = '[Your_vCHS_org_name]'
    vcloud.vdc_name = '[Your_vCHS_vdc_name]'
    vcloud.catalog_name = '[Your_vCHS_org_catalog]'
    vcloud.network_bridge = true
    vcloud.vdc_network_name = '[Your_vCHS_vdc_name]-default-routed'

  end

  nodes.each do |node|
    config.vm.define node[:hostname] do |node_config|
      node_config.vm.box = node[:box]
      node_config.vm.hostname = node[:hostname]
      node_config.vm.box_url = node[:box_url]
    end
  end
end
In this configuration file:
- “vcloud.hostname” is your vCloud Director FQDN or IP address. This should be the base URL and not by the specific URL for your org.
- “vcloud.username” is the username we will be using to connect to vCHS or vCloud Director
- “vcloud.password” is the password we will be using to connect to vCHS or vCloud Director
- “vcloud.org_name” will be the name of your vCHS or vCloud Director organization
- “vcloud.vdc_name” will be the name of your vCHS or vCloud Director virtual datacenter
- “vcloud.catalog_name” will be the name of your organization catalog a template derived from the .box file will be created in
“vcloud.dc_network_name” is the organization network the vagrant vapp will be connected to
Now we can change directory to that directory and test everything with a “vagrant up –provider=vcloud”:
[root@vagrant ~]# cd ~/vagrant-vms/precise32-test
oot@vagrant precise32-test]# vagrant up --provider=vcloud
Bringing machine 'test-vm' up with 'vcloud' provider...
==> test-vm: Box 'precise32' could not be found. Attempting to find and install...
    test-vm: Box Provider: vcloud
    test-vm: Box Version: >= 0
==> test-vm: Adding box 'precise32' (v0) for provider: vcloud
    test-vm: Downloading: http://vagrant.tsugliani.fr/precise32.box
==> test-vm: Successfully added box 'precise32' (v0) for 'vcloud'!
==> test-vm: Catalog item [precise32] in Catalog [Org Private Catalog] does not exist!
    test-vm: Would you like to upload the [precise32] box to [Org Private Catalog] Catalog?
    test-vm: Choice (yes/no): yes
==> test-vm: Uploading [precise32]...
Uploading Box...
Uploading Box...
Uploading Box... Progress: 22%  ETA: 00:02:16
Once the .box files has started uploading, you can check the progress in the org catalog of your vCloud Director instance:

- The uploading progress will get to 100% and you will see the vApp getting created, powered on and SSH access achieved:
Uploading Box...
Uploading Box... Progress: 100% Time: 00:02:32
==> test-vm: Adding [precise32] to Catalog [Org Private Catalog]
==> test-vm: Building vApp...
==> test-vm: vApp Vagrant-root-vagrant-8b9115d1 successfully created.
==> test-vm: Powering on VM...
==> test-vm: Waiting for SSH Access on 192.168.109.4:22 ...
==> test-vm: Waiting for SSH Access on 192.168.109.4:22 ...
==> test-vm: Waiting for SSH Access on 192.168.109.4:22 ...
==> test-vm: Rsyncing folder: /root/vagrant-vms/precise32-test/ => /vagrant
[root@vagrant precise32-test]# root@vagrant precise32-test]#- Test network connectivity by running “vagrant ssh”:
root@vagrant precise32-test]# vagrant ssh
==> test-vm: External IP for test-vm: 192.168.109.4
Welcome to Ubuntu 12.04 LTS (GNU/Linux 3.2.0-23-generic-pae i686)

 * Documentation:  https://help.ubuntu.com/
Welcome to your Vagrant-built virtual machine.
Last login: Thu Jul 18 11:20:25 2013
vagrant@test-vm:~$ hostname -f
test-vm- Run “vagrant vcloud –status” to validate the vCloud Director status of your vagrant vapp:
root@vagrant precise32-test]# vagrant vcloud --status
Initializing vCloud Director provider...
Fetching vCloud Director status...
+-------------------------------+-----------------------------------------+
|  Vagrant vCloud Director Status : https://[Your_vCD_URL]:443            |
+-------------------------------+-----------------------------------------+
| Organization Name             | [Your_vCHS_org_name]                    |
| Organization vDC Name         | vCHS-vagrant-demo                       |
| Organization vDC ID           | b9494d6a-ebda-4368-8f76-0e93b7edcb17    |
| Organization vDC Network Name | [Your_vCHS_vdc_name]-default-routed     |
+-------------------------------+-----------------------------------------+
| vApp Name                     | Vagrant-root-vagrant-8b9115d1           |
| vAppID                        | ec918e84-6026-42b2-8639-5390d8c88b0c    |
| -> test-vm                    | 4fc82b9b-c79d-483b-9a71-a87d22289102    |
+-------------------------------+-----------------------------------------+- Run “vagrant vcloud –network” to validate the vCloud Director network mapping of your vagrant vapp:
[root@vagrant precise32-test]# vagrant vcloud --network
Initializing vCloud Director provider...
Fetching vCloud Director network settings ...
+---------+---------------+------------+
|             Network Map              |
+---------+---------------+------------+
| VM Name | IP Address    | Connection |
+---------+---------------+------------+
| test-vm | 192.168.109.4 | Direct     |
+---------+---------------+------------+- Destroy the cloned vm by running “vagrant destroy” command:
[root@vagrant precise32-test]# vagrant destroy
    test-vm: Are you sure you want to destroy the 'test-vm' VM? [y/N] y
==> test-vm: Powering off VM...
==> test-vm: Single VM left in the vApp, Powering off vApp...
==> test-vm: Destroying vApp...
[root@vagrant precise32-test]#
You should see “Power Off vapp” and “Delete vapp” tasks being run and then completing on your organizations vapps.